HOW TO MAKE YOUR OWN MASK: Officials Want You to Wear a Mask in Public, But What If You Can't Find One? DIY

BY: DAVID SHEPHERD, NEWS DIRECTOR


DUBOIS COUNTY -- Officials with the Dubois County Health Department says residents should wear face masks if you have to leave your home during the COVID-19 outbreak.

The Centers for Disease Control (CDC) and Indiana State Department of Health (ISDH) are recommending all Hoosiers  wear a cloth face covering if they must leave their home or report to work for essential operations.

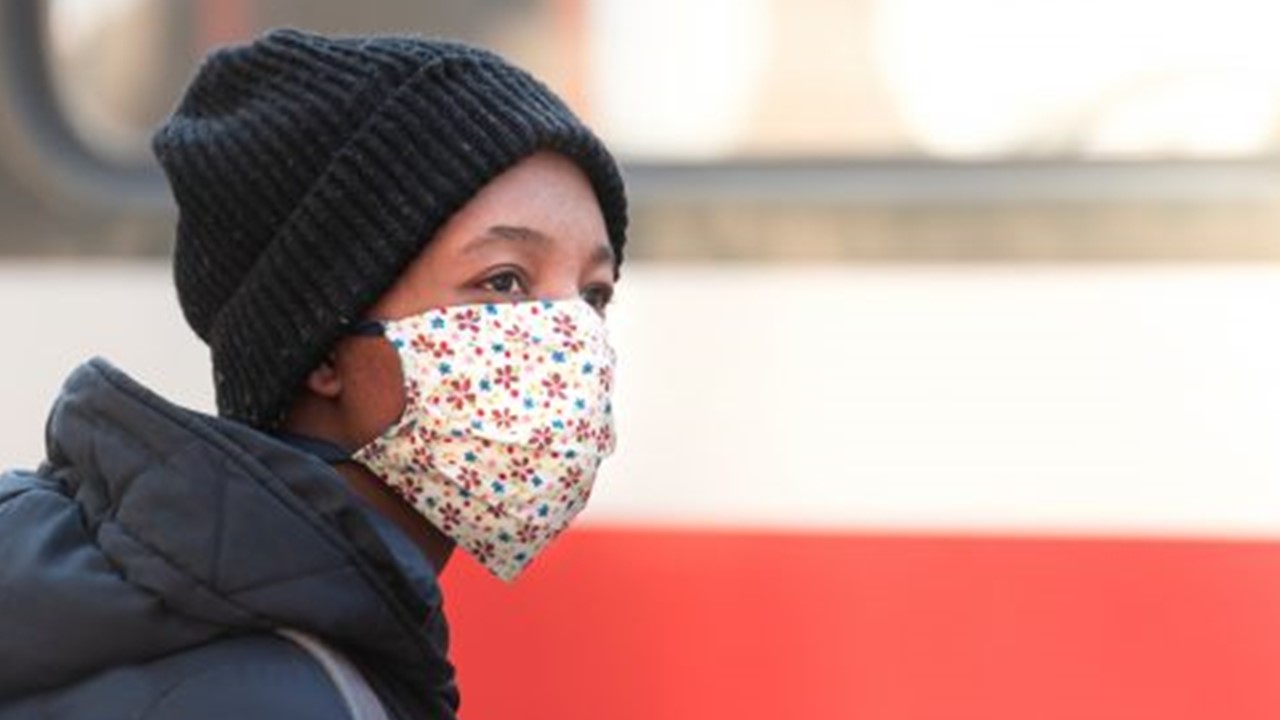
It's difficult, if not impossible, to find medical-grade face masks, but there are ways you can make your own.  (See below)

Wearing a cloth face covering is done to protect those around you if you are infected, but do not yet show symptoms of COVID-19.

When you wear a cloth face covering, make sure you can easily breathe through it and that it covers your nose AND mouth. Also wash after each use.

The Dubois County Health Department is reminding ALL that cloth face coverings are NOT a substitute for social distancing and should not encourage a false sense of security to leave home. Social distancing, staying at least 6 feet away, is still needed.

Face coverings are effective only when used in combination with frequent hand-cleaning with alcohol-based hand rub or soap and water.


DO IT YOURSELF:

Sew and No Sew Instructions

Sewn Cloth Face Covering
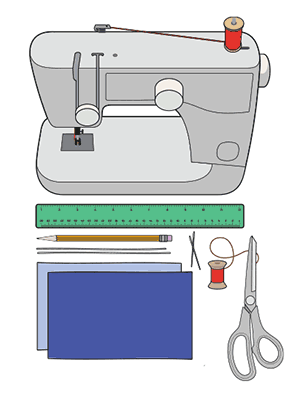
Supplies needed to create a cloth face covering are displayed. The supplies pictured include: one sewing machine, one twelve-inch ruler, one pencil, two six inch pieces of elastic string, two rectangle pieces of cotton cloth, 1 sewing needle, 1 bobby pin, 1 spool of thread, and 1 pair of scissors.

Materials

  • Two 10”x6” rectangles of cotton fabric
  • Two 6” pieces of elastic (or rubber bands, string, cloth strips, or hair ties)
  • Needle and thread (or bobby pin)
  • Scissors
  • Sewing machine

Tutorial

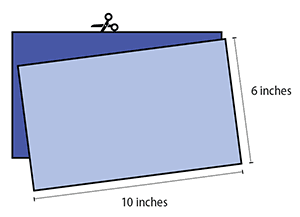
1. Cut out two 10-by-6-inch rectangles of cotton fabric. Use tightly woven cotton, such as quilting fabric or cotton sheets. T-shirt fabric will work in a pinch. Stack the two rectangles; you will sew the mask as if it was a single piece of fabric.

A close up of the two rectangular pieces of cloth needed to make a cloth face covering is shown. These pieces of cloth have been cut using a pair of scissors. Each piece of cloth measures ten inches in width and six inches in length.


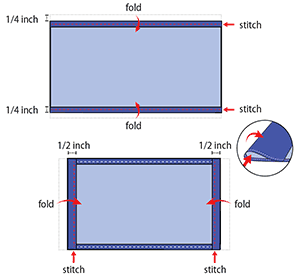
2. Fold over the long sides ¼ inch and hem. Then fold the double layer of fabric over ½ inch along the short sides and stitch down.

The top diagram shows the two rectangle cloth pieces stacked on top of each other, aligning on all sides. The rectangle, lying flat, is positioned so that the two ten inch sides are the top and the bottom of the rectangle, while the two six inch sides are the left and right side of the rectangle. The top diagram shows the two long edges of the cloth rectangle are folded over and stitched into place to create a one-fourth inch hem along the entire width of the top and bottom of the rectangle. The bottom diagram shows the two short edges of the cloth rectangle are folded over and stitched into place to create a one-half inch hem along the entire length of the right and left sides of the face covering.


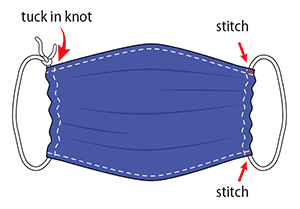
3. Run a 6-inch length of 1/8-inch wide elastic through the wider hem on each side of the mask. These will be the ear loops. Use a large needle or a bobby pin to thread it through. Tie the ends tight.
Don’t have elastic? Use hair ties or elastic head bands. If you only have string, you can make the ties longer and tie the mask behind your head.

Two six inch pieces of elastic or string are threaded through the open one-half inch hems created on the left and right side of the rectangle. Then, the two ends of the elastic or string are tied together into a knot.


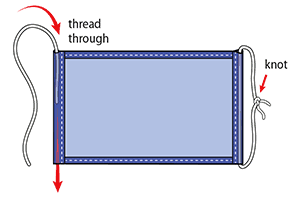
4. Gently pull on the elastic so that the knots are tucked inside the hem. Gather the sides of the mask on the elastic and adjust so the mask fits your face. Then securely stitch the elastic in place to keep it from slipping.

The diagram displays a completed face covering, in which the knots of the elastic strings are tucked inside the left and right hems of the mask and are no longer visible. The cloth is slightly gathered on its left and right sides, and additional stitching is added to the four corners of the gathered cloth rectangle, at the points where the cloth and the elastic or string overlap in these corners.


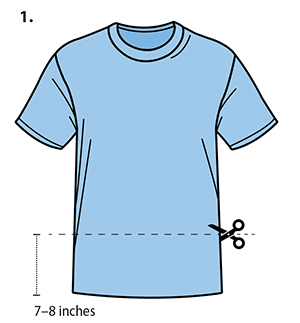
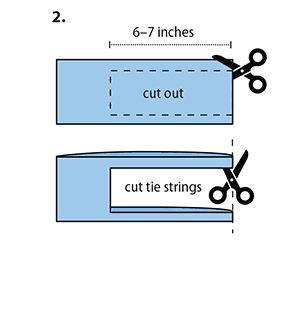
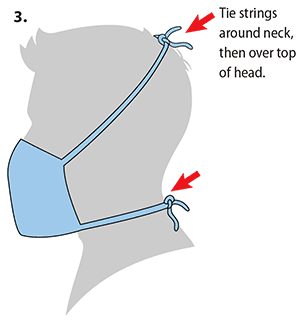
Quick Cut T-shirt Face Covering (no sew method)

Materials

  • T-shirt
  • Scissors

Tutorial

A front view of a T-shirt is shown. A straight, horizontal line is cut across the entire width of the T-shirt, parallel to the T-shirt’s waistline. Using a pair of scissors, the cut is made approximately seven to eight inches above the waistline. Both the front and back layer of the T-shirt are cut simultaneously.


The rectangle piece of cloth that has been cut from the bottom portion of the T-shirt is shown, lying flat. The rectangle is positioned so that the cut that was just made across the entire width of the shirt is the top side of the rectangle while the original waistline of the T-shirt is the bottom side of the rectangle. From the top right-hand corner of the rectangle, the scissors are moved down approximately one-half inch, along the right, hemmed side of the rectangle. From this point, a six to seven-inch, horizontal cut is made through both the front and back side of the cloth, parallel to the top of the rectangle. The scissors then turn ninety-degrees to cut downward, a vertical line that is parallel to the left side of the rectangle; this cut continues downward until it reaches approximately one-half inch above the bottom of the rectangle. The scissors then turn ninety-degrees again to create another six to seven-inch, horizontal cut that runs parallel to the bottom of the rectangle, back towards the right, hemmed side of the shirt, and cuts through the right, hemmed side of the rectangle. This newly cut out piece of cloth is laid to the side. To cut tie strings, the two remaining slivers of the right side of the rectangle are cut vertically along the hem.


The final piece of cloth is unfolded and worn by an individual. The middle of the cloth piece is positioned to cover the nose and mouth area. The four thin pieces of cloth act as tie strings to hold the cloth face covering in place. The strings around neck, then over top of head are tied into knots.


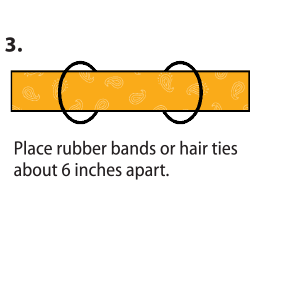
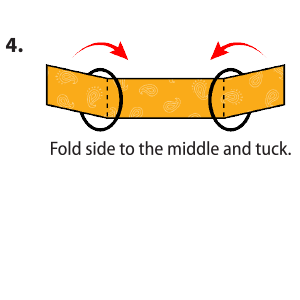
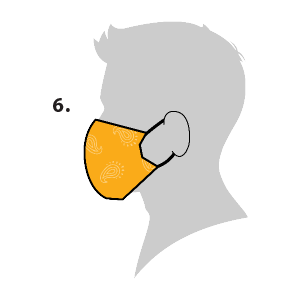
Bandana Face Covering (no sew method)

Materials

  • Bandana (or square cotton cloth approximately 20”x20”)
  • Rubber bands (or hair ties)
  • Scissors (if you are cutting your own cloth)

Tutorial

A single coffee filter is shown lying flat, with the curved edge at the top. Cut coffee filter in half with a horizontal line.


The square bandanna is shown lying flat. The bandanna is then folded in half, bringing the top edge of the bandanna to meet the bottom edge of the bandanna.


The top half of the coffee filter, with the curved edge at the top, is placed in the center of the folded bandanna. Then, fold filter in center of folded bandanna. Fold top down. Fold bottom up, to cover the filter entirely.


Insert the folded bandana, with the filter inside, through the center of two rubber bands or hair ties. Place rubber bands or hair ties about 6 inches apart.


Take the left side and the right side of the bandanna and fold each side to the middle and tuck the sides into each other.


The bandanna should now be a continuous, cloth loop since the left and right sides have been tucked into each other.